Category: Recipes

  • Classic Green Bean Casserole Recipe: A Comfort Food Favorite

    Classic Green Bean Casserole Recipe: A Comfort Food Favorite

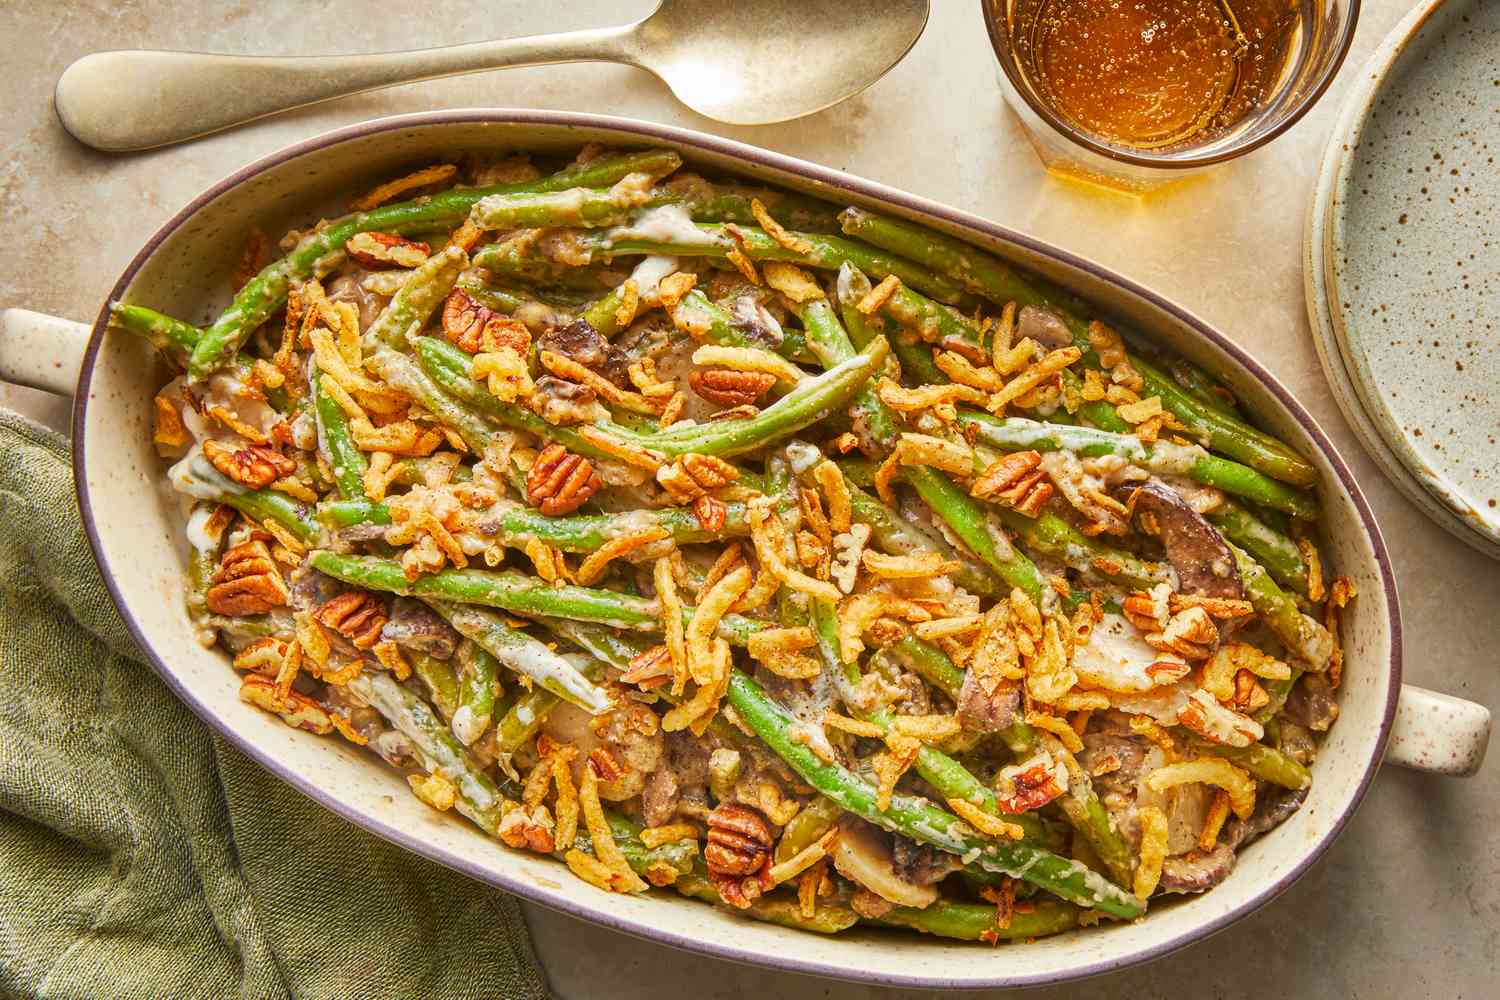
    Green bean casserole has been a staple of holiday tables and weeknight dinners for decades. Creamy, savory, and topped with golden, crispy fried onions, it’s a dish that brings comfort and nostalgia with every bite. Whether you’re preparing it for Thanksgiving, a potluck, or just because you’re craving something cozy, this guide will walk you through how to make the perfect green bean casserole from scratch.

    Why Green Bean Casserole?

    Originally introduced in the 1950s, green bean casserole is a perfect balance of texture and flavor: tender green beans, creamy mushroom sauce, and a crispy topping. It’s easy to prepare, budget-friendly, and universally loved.

    This version of the recipe includes both traditional and homemade options, so you can choose how from-scratch you want to go.

    Ingredients and Measurements

    Classic Version (Serves 6–8):

    • 1 can (10.5 oz) condensed cream of mushroom soup
    • 3/4 cup milk
    • 1/8 teaspoon black pepper
    • 4 cups cooked green beans (fresh or canned)
    • 1 1/3 cups crispy fried onions (like French’s)

    Optional Add-ins:

    • 1/2 cup shredded cheddar cheese
    • 1/2 teaspoon garlic powder
    • Pinch of nutmeg for added depth

    Homemade Mushroom Sauce Version:

    • 1 tablespoon butter
    • 1 tablespoon flour
    • 1/2 cup chopped mushrooms
    • 1 cup whole milk or half-and-half
    • Salt and pepper to taste

    Step-by-Step Instructions

    Step 1: Prepare the Green Beans

    If using fresh green beans, trim the ends and boil them for 5–6 minutes until just tender. Drain and rinse under cold water to stop cooking. If using canned beans, drain and pat dry.

    Step 2: Make the Sauce

    Classic method: In a large bowl, whisk together the cream of mushroom soup, milk, pepper, and optional seasonings like garlic powder or nutmeg.
    Homemade sauce: In a skillet, melt butter and sauté the mushrooms for 3–4 minutes. Sprinkle in flour, stir for 1 minute, then slowly whisk in the milk. Cook over medium heat until thickened. Season with salt and pepper.

    Step 3: Combine the Ingredients

    Add the green beans to the soup mixture and stir to coat evenly. If using cheese, mix it in at this stage.

    Step 4: Bake the Casserole

    Preheat the oven to 350°F (175°C). Pour the mixture into a 9×13-inch baking dish. Bake uncovered for 25–30 minutes until bubbly.

    Step 5: Add the Crispy Onions

    Remove the casserole from the oven and sprinkle fried onions evenly on top. Return to the oven for another 5–10 minutes, or until the onions are golden and crispy.

    Step 6: Serve and Enjoy

    Let the casserole cool for a few minutes before serving. It pairs perfectly with roasted meats, mashed potatoes, or stuffing.

    Tips for the Best Green Bean Casserole

    • Use fresh green beans for a crisp-tender bite and brighter flavor
    • Don’t overbake after adding onions, or they’ll burn
    • Add a bit of cheddar or Parmesan cheese to boost flavor
    • A pinch of nutmeg in the sauce brings out the earthiness of the mushrooms
    • Double the recipe for larger gatherings—it disappears fast

    Variations to Try

    • Bacon Green Bean Casserole: Add crumbled cooked bacon to the mixture
    • Vegan Version: Use plant-based milk, vegan cream of mushroom soup, and dairy-free fried onions
    • Spicy Kick: Add a dash of hot sauce or red pepper flakes to the sauce
    • Gluten-Free Option: Use gluten-free cream of mushroom soup and gluten-free fried onions

    Storage and Reheating

    • Refrigerate: Store leftovers in an airtight container for up to 4 days
    • Reheat: Warm in the oven at 350°F until heated through or microwave individual servings
    • Freezing: You can freeze the casserole (without the onion topping) for up to 1 month. Add fresh onions and bake before serving

    Green bean casserole is more than a side dish—it’s a celebration of tradition, flavor, and simplicity. Whether you go for the quick classic method or take the time to make everything from scratch, the result is always satisfying. This dish is beloved not just for its taste, but for the warm memories it brings to the table.

    Try it once, and you’ll understand why green bean casserole continues to be a favorite across generations.

  • How to Make the Perfect Pizza Dough from Scratch (Step-by-Step Guide)

    How to Make the Perfect Pizza Dough from Scratch (Step-by-Step Guide)

    There’s something incredibly satisfying about crafting your own pizza dough from scratch. The smell of yeasty dough rising, the feel of it stretching under your fingers, and finally, that first bite into a perfectly baked crust—crispy, chewy, or pillowy-soft, just the way you like it. Whether you’re a beginner or a seasoned home cook, this guide walks you through everything you need to know to make the perfect pizza dough, including the science behind yeast, pro tips, and dough variations.

    Ingredients and Measurements

    For a classic pizza dough (makes 2 medium pizzas):

    • 3 ½ cups (440g) all-purpose flour or bread flour
    • 1 cup + 2 tablespoons (270ml) warm water (around 105–110°F / 40–43°C)
    • 2 ¼ teaspoons (7g) active dry yeast (1 standard packet)
    • 2 teaspoons (10g) sugar
    • 2 tablespoons (30ml) olive oil
    • 1 ½ teaspoons (9g) salt

    The Science Behind Yeast Fermentation

    Yeast is a living microorganism that feeds on sugar and starch in your dough, producing carbon dioxide and alcohol in the process. This fermentation helps the dough rise and develop complex flavors. Carbon dioxide creates gas bubbles, causing the dough to expand and become airy, while alcohol adds a slight tang and aroma.

    Two Types of Fermentation:

    1. Bulk Fermentation (first rise): Develops gluten and flavor
    2. Cold Fermentation (optional second rise in fridge): Slows down fermentation, creating deeper flavors and a chewier texture

    Step-by-Step Guide to Making Pizza Dough

    1. Activate the Yeast

    In a bowl, combine warm water, sugar, and yeast. Let it sit for 5–10 minutes until it becomes foamy. This means the yeast is alive and active.
    Tip: If your mixture doesn’t foam, your yeast might be dead. Start over with fresh yeast and check the water temperature.

    2. Mix the Dough

    Add flour and salt to a large mixing bowl. Make a well in the center and pour in the yeast mixture and olive oil. Stir with a wooden spoon or dough hook until a shaggy dough forms.

    3. Knead the Dough

    Knead on a lightly floured surface for 8–10 minutes (or use a stand mixer for 5–6 minutes) until the dough is smooth and elastic.
    Tip: Use the windowpane test. Stretch a small piece of dough—if you can see light through it without tearing, it’s ready.

    4. Let It Rise (Bulk Fermentation)

    Form the dough into a ball, coat lightly with oil, and place it in a bowl. Cover with plastic wrap or a damp cloth. Let it rise at room temperature for 1 to 1.5 hours or until doubled in size.

    5. Divide and Shape

    Punch down the dough to release gas. Divide into two balls for medium pizzas. Let rest for 15 minutes before stretching.

    6. Cold Fermentation (Optional)

    Wrap dough balls in plastic wrap or store in an airtight container in the refrigerator for up to 72 hours. Bring to room temperature before using.

    Tips for Perfect Texture

    For Crispy Crust

    • Use a pizza stone or steel preheated to 500°F (260°C) for 45 minutes
    • Roll the dough thinner and avoid overloading with toppings
    • Bake on the lowest rack

    For Chewy Crust

    • Use bread flour (higher gluten content)
    • Cold ferment for 24–48 hours
    • Don’t overwork the dough before baking

    For Airy & Puffy Crust

    • Use high hydration (more water in dough)
    • Handle gently during stretching to keep air pockets
    • Let dough rest for 20–30 minutes after shaping

    Dough Variations

    1. Neapolitan Pizza Dough

    • 4 cups (500g) 00 flour
    • 1 ½ teaspoons (9g) salt
    • 1 ½ cups (360ml) water
    • 1 teaspoon (3g) dry yeast

    Ferment 8–24 hours. Bake at the highest temp (ideally 800°F in a wood oven or use broiler + pizza stone combo)

    2. New York-Style Pizza Dough

    • 3 ¾ cups (480g) bread flour
    • 1 tablespoon (15g) sugar
    • 1 ½ teaspoons (9g) salt
    • 1 tablespoon (15ml) olive oil
    • 1 ¼ cups (300ml) warm water
    • 1 teaspoon (3g) yeast

    Cold ferment 24–72 hours. Bake at 500°F until golden brown and foldable.

    3. Whole Wheat Pizza Dough

    • 2 cups (240g) whole wheat flour
    • 1 cup (120g) all-purpose flour
    • 1 tablespoon (15ml) olive oil
    • 1 ½ cups (360ml) warm water
    • 2 teaspoons (7g) yeast
    • 1 ½ teaspoons (9g) salt

    Slightly denser, nuttier flavor. Let it rest longer to soften the bran.

    Common Mistakes to Avoid

    1. Water too hot or too cold can kill or deactivate yeast
    2. Too much flour makes dough stiff and dry
    3. Not letting dough rise enough results in dense, flavorless crust
    4. Skipping rest time after shaping causes shrinkage when stretching
    5. Overloading with toppings makes crust soggy or undercooked

    How to Store Leftover Dough

    Refrigerator: Coat with oil, store in a sealed container for up to 3 days
    Freezer: Wrap in plastic and a freezer bag. Lasts up to 3 months. Thaw in fridge overnight before use
    Tip: Always let refrigerated or frozen dough come to room temp before stretching

    The perfect pizza dough isn’t about perfection—it’s about the balance of science, ingredients, and love. Whether you’re after a thin crispy base or a thick airy crust, once you master the dough, the rest of pizza night is a breeze. With this guide in your back pocket, you’re well on your way to becoming your own favorite pizzeria.

    Happy baking!

  • The Ultimate Homemade Meatball Recipe: Juicy, Flavorful, and Comforting

    The Ultimate Homemade Meatball Recipe: Juicy, Flavorful, and Comforting

    Few dishes bring as much comfort to the table as a plate of tender, juicy meatballs. Whether served over spaghetti, tucked into a warm sub roll, or enjoyed on their own with a rich tomato sauce, meatballs are the kind of hearty meal that satisfies every craving.

    Making meatballs from scratch might sound intimidating, but it’s actually simple—and the results are far superior to anything store-bought. With a handful of everyday ingredients and a few easy steps, you’ll have a batch of meatballs that are perfectly seasoned, moist on the inside, and packed with flavor.

    Let’s dive into this easy-to-follow, foolproof recipe.

    What You’ll Need

    Ingredients for the meatballs:

    • 1 pound ground beef (or mix with ground pork for extra flavor)
    • 1/2 cup breadcrumbs
    • 1/4 cup grated Parmesan cheese
    • 1/4 cup chopped fresh parsley (or 1 tablespoon dried)
    • 1 large egg
    • 2 garlic cloves, minced
    • 1/2 teaspoon salt
    • 1/4 teaspoon black pepper
    • 1/2 teaspoon dried oregano
    • 2 tablespoons milk (adds moisture)

    Optional for cooking:

    • Olive oil (if pan-frying)
    • Your favorite marinara or tomato sauce

    How to Make Meatballs

    Step 1: Mix the ingredients
    In a large bowl, combine the ground meat, breadcrumbs, Parmesan, parsley, egg, garlic, salt, pepper, oregano, and milk. Use your hands or a fork to gently mix everything together. Don’t overwork the meat—mix just until combined for tender results.

    Step 2: Shape the meatballs
    Scoop about 1 to 1.5 tablespoons of the mixture and roll it into balls using your hands. You should end up with around 18 to 20 meatballs.

    Step 3: Cook the meatballs
    You have two great options for cooking:

    Pan-fried:
    Heat a few tablespoons of olive oil in a skillet over medium heat. Cook the meatballs in batches, turning occasionally, until browned on all sides and cooked through (about 10–12 minutes total).

    Baked:
    Preheat your oven to 400°F (200°C). Place meatballs on a baking sheet lined with parchment paper or foil. Bake for 18–20 minutes, or until golden and cooked through.

    Step 4: Add to sauce (optional but recommended)
    Once the meatballs are cooked, simmer them in warm marinara sauce for 10–15 minutes. This not only enhances their flavor but also keeps them moist and tender.

    Tips for the Best Meatballs

    • For extra juicy meatballs, don’t skip the milk and egg—they help bind and moisten.
    • Want extra flavor? Use a mix of ground beef and ground pork or veal.
    • Chill the meatballs in the fridge for 15–20 minutes before cooking to help them hold their shape.
    • Use a cookie scoop for uniform size, which ensures even cooking.

    Serving Suggestions

    Meatballs are incredibly versatile! Try serving them:

    • Over spaghetti with marinara for a classic Italian meal
    • In a toasted hoagie roll with melted mozzarella for a meatball sub
    • With mashed potatoes and gravy for a cozy dinner
    • On toothpicks as an appetizer with a dipping sauce
    • With rice or couscous for a simple weeknight dinner

    Once you make these homemade meatballs, you’ll wonder why you ever settled for frozen. They’re comforting, delicious, and perfect for feeding a crowd or stocking your freezer for later. So grab your ingredients and get rolling—your perfect batch of meatballs awaits!

  • Homemade Chicken Noodle Soup Recipe: Comfort in a Bowl

    Homemade Chicken Noodle Soup Recipe: Comfort in a Bowl

    When you’re feeling under the weather, craving something warm and soothing, or just in the mood for a hearty, homemade meal, chicken noodle soup is the answer. This timeless classic has been loved for generations—and for good reason. It’s nourishing, flavorful, and surprisingly easy to make from scratch!

    Why You’ll Love This Recipe

    This chicken noodle soup is:

    • Packed with fresh veggies and tender chicken
    • Full of rich, savory flavor
    • Made in one pot for easy cleanup
    • Perfect for freezing and reheating later

    Ingredients

    • 2 tablespoons olive oil
    • 1 medium onion, chopped
    • 2 garlic cloves, minced
    • 3 medium carrots, sliced
    • 2 celery stalks, sliced
    • 8 cups chicken broth (low sodium)
    • 2 cups cooked chicken (shredded or diced)
    • 2 cups egg noodles
    • 1 teaspoon dried thyme
    • 1/2 teaspoon black pepper
    • Salt to taste
    • Fresh parsley for garnish (optional)

    Instructions

    1. Sauté the veggies
      Heat olive oil in a large pot over medium heat. Add onions, carrots, and celery. Cook for about 5 minutes until softened. Stir in garlic and cook for another minute.
    2. Add broth and seasoning
      Pour in the chicken broth. Add thyme, pepper, and salt. Bring everything to a boil.
    3. Add noodles and chicken
      Once boiling, reduce the heat to a simmer. Add the egg noodles and shredded chicken. Simmer for 10-12 minutes, or until the noodles are tender.
    4. Taste and adjust
      Taste the soup and adjust seasoning as needed. Add more salt or pepper if desired.
    5. Serve and enjoy
      Ladle into bowls, sprinkle with fresh parsley if using, and enjoy with warm bread or crackers.

    Tips & Variations

    • Make it creamy: Add a splash of cream or milk for a richer texture.
    • Use rotisserie chicken: Saves time and adds great flavor.
    • Gluten-free version: Swap egg noodles for gluten-free pasta or rice.
    • Add greens: Stir in a handful of spinach or kale at the end for extra nutrients.

    Why Homemade is Better

    Unlike canned soup, homemade chicken noodle soup is free from preservatives and allows you to control the salt and ingredients. Plus, the flavors are fresher, and the texture is more satisfying.


    Homemade chicken noodle soup is more than just a meal—it’s comfort in a bowl. Whether you’re making it for a sick day or a cozy night in, this recipe will warm you up from the inside out.

    Let me know if you’d like a printable version or a shorter blog-style version for posting!

  • The Best Sugar Cookie Recipe: Soft, Sweet, and Perfect for Any Occasion

    The Best Sugar Cookie Recipe: Soft, Sweet, and Perfect for Any Occasion

    Sugar cookies have a way of making everything feel a little brighter. Their soft centers, crisp edges, and buttery vanilla flavor make them a timeless favorite. Whether you’re baking for the holidays, a birthday party, or just a cozy day at home, sugar cookies are always a welcome treat.

    This easy recipe will guide you through making the perfect sugar cookies from scratch—simple, delicious, and endlessly customizable.

    What You’ll Need

    Ingredients:

    • 1 cup (2 sticks) unsalted butter, softened
    • 1 cup granulated sugar
    • 1 large egg
    • 1 1/2 teaspoons vanilla extract
    • 2 3/4 cups all-purpose flour
    • 1/2 teaspoon baking powder
    • 1/2 teaspoon salt

    Optional for decorating:

    • Sprinkles
    • Colored sugar
    • Royal icing or simple glaze

    How to Make Sugar Cookies

    Step 1: Preheat the oven
    Set your oven to 350°F (175°C). Line baking sheets with parchment paper to prevent sticking.

    Step 2: Cream the butter and sugar
    In a large bowl, beat the softened butter and granulated sugar until light and fluffy. This takes about 2–3 minutes and helps create a soft texture.

    Step 3: Add egg and vanilla
    Mix in the egg and vanilla extract until fully combined and smooth.

    Step 4: Combine the dry ingredients
    In a separate bowl, whisk together the flour, baking powder, and salt. Gradually add this dry mix to the wet ingredients and stir until a dough forms.

    Step 5: Roll and cut the cookies
    If making shaped cookies, lightly flour your surface and roll the dough to about 1/4 inch thick. Use cookie cutters to create your desired shapes. If making classic round cookies, roll the dough into 1-inch balls and gently flatten them with your hand or the bottom of a glass.

    Step 6: Bake
    Place cookies 2 inches apart on the baking sheet and bake for 8–10 minutes, or until the edges are just beginning to turn golden. Don’t overbake—soft cookies are key!

    Step 7: Cool completely
    Allow cookies to cool on the baking sheet for a few minutes before transferring them to a wire rack to cool fully. This helps them set and keeps them from breaking.

    Tips for Sweet Success

    • If the dough is too soft to work with, chill it in the fridge for 30 minutes.
    • For extra flavor, add a teaspoon of almond extract or a bit of citrus zest.
    • To keep cookies uniform in thickness, use rolling pin guides or bands.
    • Want crisper cookies? Bake a minute or two longer and roll the dough slightly thinner.

    Serving Ideas and Fun Variations

    Sugar cookies are perfect on their own, but here are a few ways to make them extra special:

    • Decorate with royal icing and sprinkles for a festive touch.
    • Dip one half of each cookie in melted chocolate and let it set.
    • Sandwich two cookies with frosting or Nutella for a sweet surprise.
    • Add colored sugar before baking for an easy pop of color.

    There’s a reason sugar cookies have stood the test of time. They’re versatile, crowd-pleasing, and incredibly fun to make. Whether you enjoy them plain or all dressed up, this sugar cookie recipe is one you’ll come back to again and again. Happy baking!

  • The Ultimate Chocolate Chip Cookie Recipe

    The Ultimate Chocolate Chip Cookie Recipe

    There’s a reason chocolate chip cookies are one of the most loved treats around the world. They’re sweet, slightly crisp on the edges, soft in the center, and full of gooey chocolate in every bite. Whether it’s for an after-school snack, a weekend baking project, or just because you’re craving something sweet, chocolate chip cookies are always a good idea.

    The beauty of this classic cookie lies in its simplicity—and when done right, it’s pure magic. This recipe will guide you step-by-step through making the perfect batch of chocolate chip cookies, complete with helpful tips and serving ideas to make your cookies extra special.

    What You’ll Need

    Ingredients:

    • 1 cup (2 sticks) unsalted butter, softened
    • 3/4 cup granulated sugar
    • 3/4 cup brown sugar, packed
    • 2 large eggs
    • 2 teaspoons vanilla extract
    • 2 1/4 cups all-purpose flour
    • 1 teaspoon baking soda
    • 1/2 teaspoon salt
    • 2 cups semi-sweet chocolate chips (or mix with milk/dark if you like variety)
    • Optional: 1/2 cup chopped walnuts or pecans for a nutty crunch

    How to Make Chocolate Chip Cookies

    Step 1: Preheat your oven
    Set your oven to 375°F (190°C). Line two baking sheets with parchment paper or silicone baking mats for easy cleanup and even baking.

    Step 2: Cream the butter and sugars
    In a large mixing bowl, use an electric mixer or a sturdy spoon to cream the softened butter with the granulated sugar and brown sugar until light and fluffy. This step helps create that soft, chewy texture.

    Step 3: Add eggs and vanilla
    Beat in the eggs one at a time, followed by the vanilla extract. Mix until everything is smooth and creamy.

    Step 4: Combine the dry ingredients
    In a separate bowl, whisk together the flour, baking soda, and salt. Gradually add this dry mixture to the wet ingredients, mixing until just combined.

    Step 5: Fold in the chocolate chips
    Gently stir in the chocolate chips (and nuts if using). Try not to overmix—just enough to evenly distribute the chips.

    Step 6: Scoop and shape
    Use a cookie scoop or spoon to drop rounded tablespoons of dough onto the prepared baking sheets, leaving about 2 inches between each cookie to allow for spreading.

    Step 7: Bake to perfection
    Bake for 9 to 11 minutes, or until the edges are golden brown and the centers still look slightly soft. They’ll continue to cook a bit on the baking sheet after coming out of the oven, so don’t overbake.

    Step 8: Cool and enjoy
    Let the cookies cool on the baking sheet for 5 minutes, then transfer to a wire rack to cool completely (if you can wait that long!).

    Tips for the Best Cookies

    • Use room temperature butter—not melted—for the ideal texture.
    • Chill the dough for 30 minutes if you want thicker, bakery-style cookies.
    • For extra gooey centers, underbake just slightly.
    • Sprinkle a tiny pinch of sea salt on top before baking for a sweet-salty finish.

    Delicious Ways to Serve Your Cookies

    • Enjoy them warm with a cold glass of milk—classic and unbeatable.
    • Sandwich a scoop of vanilla ice cream between two cookies for the ultimate dessert.
    • Crumble over yogurt or ice cream for a sweet topping.
    • Wrap a few in parchment paper and tie with a string for a thoughtful homemade gift.

    There’s nothing quite like pulling a tray of freshly baked chocolate chip cookies out of the oven. They’re cozy, comforting, and guaranteed to bring a smile to anyone’s face. So grab your ingredients, preheat that oven, and treat yourself to the warm, gooey magic of homemade chocolate chip cookies. You deserve it!

  • The Perfect Banana Bread: A Cozy Classic You’ll Love to Bake

    The Perfect Banana Bread: A Cozy Classic You’ll Love to Bake

    There’s something about the smell of banana bread baking in the oven that instantly feels like home. Warm, sweet, and just the right amount of nostalgic, banana bread is one of those comfort foods that never goes out of style. Not only is it incredibly delicious, but it’s also a smart way to use up those overripe bananas sitting on your counter. Soft, moist, and full of flavor, banana bread is easy to make and even easier to love.

    Whether you’re new to baking or a seasoned pro, this simple, step-by-step guide will help you make the perfect banana bread every time.

    What You’ll Need

    Ingredients:

    • 3 ripe bananas (the spottier, the better)
    • 1/3 cup melted butter
    • 3/4 cup sugar (adjust to taste)
    • 1 egg, beaten
    • 1 teaspoon vanilla extract
    • 1 teaspoon baking soda
    • Pinch of salt
    • 1 1/2 cups all-purpose flour

    Optional Add-ins (choose your favorite):

    • 1/2 cup chopped walnuts or pecans
    • 1/2 cup chocolate chips
    • 1/2 teaspoon cinnamon for added warmth

    How to Make Banana Bread

    Step 1: Prep your oven and pan
    Preheat your oven to 350°F (175°C). Lightly grease a 4×8-inch loaf pan or line it with parchment paper for easy removal.

    Step 2: Mash the bananas
    In a large mixing bowl, mash the ripe bananas with a fork until completely smooth. This is where the magic starts—those ripe bananas are the key to a naturally sweet and moist loaf.

    Step 3: Mix in the wet ingredients
    Stir the melted butter into the mashed bananas. Then add sugar, the beaten egg, and vanilla extract. Mix until everything is well combined.

    Step 4: Add the dry ingredients
    Sprinkle the baking soda and salt over the mixture and stir it in. Then add the flour and gently fold it in with a spatula or spoon. Be careful not to overmix—just until you don’t see any more flour. If you’re using nuts, chocolate chips, or cinnamon, fold them in now.

    Step 5: Pour and bake
    Pour the batter into your prepared loaf pan and smooth out the top. Bake for 50–60 minutes, or until a toothpick inserted into the center comes out clean. Every oven is a bit different, so start checking around the 50-minute mark.

    Step 6: Cool before slicing
    Let the banana bread cool in the pan for about 10–15 minutes, then transfer it to a wire rack to cool completely. This helps it firm up and makes slicing easier.

    Tips for Banana Bread Success

    • Use very ripe bananas—brown and spotty bananas are sweeter and mash more easily.
    • Don’t overmix the batter. This can make the bread dense or tough.
    • Want extra moisture? Add 1/4 cup of sour cream or Greek yogurt.
    • For a bakery-style look, slice an extra banana lengthwise and lay it on top before baking.

    Serving Suggestions

    Banana bread is wonderful on its own, but here are some ways to enjoy it even more:

    • Spread with a little butter or cream cheese for a cozy breakfast.
    • Toast slices and drizzle with honey or maple syrup.
    • Serve warm with a scoop of vanilla ice cream for dessert.
    • Pair with your favorite tea or coffee for a mid-afternoon treat.

    There’s just something special about homemade banana bread. It brings a bit of comfort to any day and fills your kitchen with the kind of aroma that makes everyone smile. So next time you spot some overripe bananas, don’t toss them—turn them into the perfect loaf of banana bread. Happy baking!